How to Make Almond Milk at Home in 5 Easy Steps?
Almond milk is one of the most popular plant-based milks. It is rich in nutrients and suitable for lactose-intolerant individuals. It is taken neat, on cereal, or as an ingredient in cooking and baking. People like it because it has a light, nutty taste and fewer calories than cow's milk.
Various brands of almond milk are displayed in supermarkets. Most of them have additional ingredients that change the taste of the milk, and some are even preserved.
That's why it is better to make almond milk at home. When you make it yourself, you are the boss of what goes into the drink. It is fresh and clean, and you can add things that you prefer.
It is very easy to make almond milk at home. In this post, we will teach you step-by-step. You require just a few ingredients, and you can make some that are even better than the store-bought ones.
Let's start with the process!
Step 1: Soak the Almonds
Take a cup of raw almonds and wash them under running water, preferably cold water. Place the almonds in a dish and pour about two cups of water over them.
Ensure that they are fully covered we are going for cheerful, well-soaked almonds here!
Now, patience is key. They should be soaked overnight, though if you are pressed for time, 6-8 hours will suffice.
This will soften those hard little nuts so that blending them will be easy.
Also, it is less stressful for one's digestive system. Soaked almonds are also easier on the tummy and enable the body to assimilate more of their benefits. Win-win, right?
Step 2: Drain and Rinse
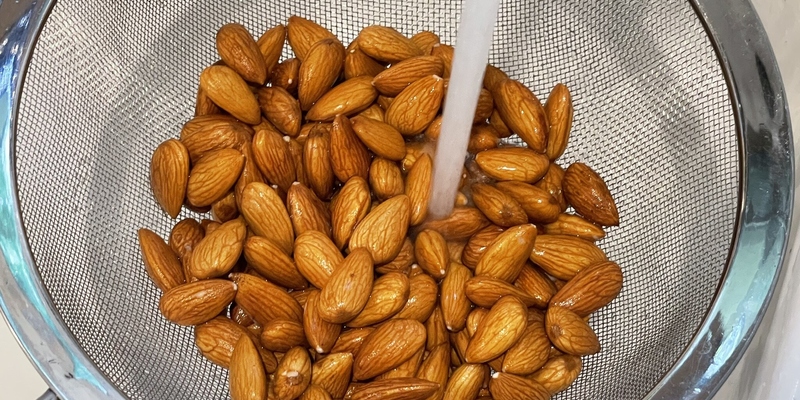
Alright, rise and shine, sleepyhead almonds! After their overnight soak, it's time to wake them up with a refreshing rinse.
First things first, grab a colander and pour your almonds into it. Watch the soaking water swirl down the drainits job is done.
Now, turn on the tap and give those almonds a good rinse. Make sure every almond gets a wash.
Why all this fuss about rinsing? Well, it's not just about getting them clean. The soaking process released phytic acid from the almonds.
If we left that hanging around, it could make our milk taste a bit off. Nobody wants funky-tasting almond milk. So, a thorough rinse ensures we're starting fresh for the next step.
Step 3: Blend with Water
Now we're getting to the fun part! It's time to transform those almonds into creamy, dreamy milk.
Toss your rinsed almonds into a blender. Now, here's where you get to play almond milk mixologist. For every cup of almonds, add about 4 cups of fresh water.
This ratio gives a nice, creamy consistency. It's your kitchen. If you like it thicker or thinner, adjust it away!
Hit that blend button, and let 'er rip! You'll want to blend for a good minute or two. The goal? Smooth, creamy goodness with no chunky bits.
Keep an eye on it as it blends. If it looks a bit thick, add a splash of more water. Too thin? Add a few more almonds.
Remember, we're aiming for silky smoothness here. Your blender's working hard, so give it a rest if it starts to sound unhappy.
Step 4: Strain the Mixture
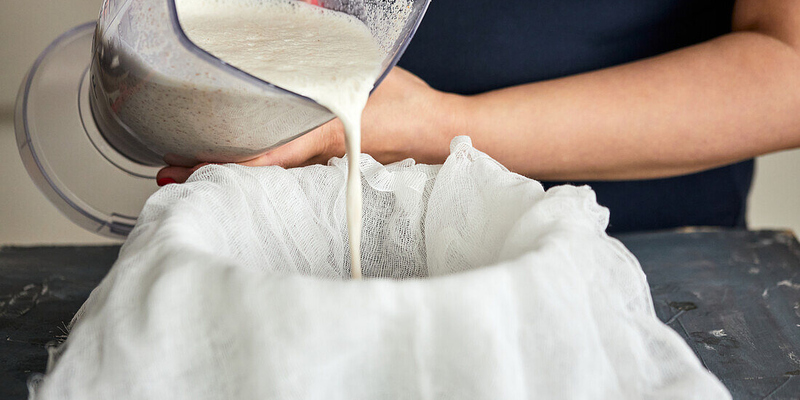
Alright, we're in the home stretch now! Time to separate our creamy almond milk from the pulp.
Grab a big bowl and place a nut milk bag or fine mesh strainer over it. If you don't have either, a clean tea towel works in a pinch.
Now, slowly pour your blended mixture into the bag or strainer. Watch as the smooth, white milk flows through, leaving the pulp behind.
Once you've poured it all in, let it drain naturally for a minute. Then, if you're using a bag, gently squeeze to get every last drop out.
This straining step is crucial for the smooth, store-bought texture we want. No one wants chunky almond milk in their coffee, right?
Don't toss that leftover pulp, though! It's great in smoothies or baked goods. Waste not, want not, as the saying goes.
Step 5: Sweeten and Flavor (Optional)
First up, sweeteners. If you have a sweet tooth, try adding a splash of maple syrup or a squirt of honey. Dates work great, toojust blend a couple with your milk.
Now, for the flavor fanatics. A dash of vanilla extract can take your milk from good to great. Chocolate lover? A spoonful of cocoa powder will do the trick.
Remember, start small with your add-ins. You can always add more, but you can't remove them once they're in there!
After adding your chosen flavors, give your milk a good stir or a quick blend. Taste test as you goyou're the chef here, after all.
And voila! Your very own custom almond milk creation is ready to enjoy.
Conclusion
That's it! This is the simple process of making your delicious homemade almond milk! We promise you that once you have that fresh taste of the creamy texture, you'll be wondering why you haven't tried it before.
Experiment with flavors. Perhaps cinnamon almond milk with your cup of coffee in the morning? A glass of chocolate almond milk can also be a better sweet treat.
Remember, practice makes perfect. The first batch that you design does not always have to be perfect; it is all part of the enjoyment. Never let what you're doing get perfectly right; try to get it right about 80 percent of the time, and then tune it up the rest of the way.
So what are you waiting for? Get those almonds and get popping. It is guaranteed that your tongue will do cartwheels for such a combination!
Frequently Asked Questions
Q: How long does homemade almond milk last?
Ans: Homemade almond milk typically stays fresh for 3-5 days if stored in an airtight container in the fridge. Give it a good shake before using it, and if it smells off, it's time to make a new batch.
Q: Can I use other nuts instead of almonds?
Ans: Absolutely! This method works great with cashews, hazelnuts, or even a mix. Each nut brings its own flavor, so experiment and find your favorite. Just keep the soaking and blending process the same.
Q: What can I do with the leftover almond pulp?
Ans: Don't toss it! Almond pulp is versatile. Use it in smoothies, baked goods, or as a yogurt topping. You can even dry it out to make almond flour. It's packed with fiber and nutrients.
Q: Can I make almond milk without soaking the almonds?
Ans: You can, but soaking is better. Unsoaked almonds make grittier milk and are harder to blend. Plus, soaking helps your body absorb more nutrients. If you're in a rush, try soaking in hot water for 30 minutes instead.